Cofax logo www.cofax.org


Welcome to the Cofax.org web site 
AboutTechnologyDownloadCofax in ActionContactsDevelopmentDocumentationSite map
> Home > Documentation > User Guide /


User Guide


> Cofax Navigation


Clicking on the Cofax Navigation tab will open a new window on the left side of your screen. A tree view of the current publication will be there. Using this is an easy way to go to the editing screen for the component of the publication you click on.

Clicking on the publication's name will take you to a page where you can edit that publication's properties.

Clicking on a section name will take you to a page where you can edit that section's properties.

Finally, clicking on an article will take you the Articles screen with that article's properties already filled in, awaiting your edits.

Naturally, the ability to do any editing is contingent on you having the right to do that. If you have any questions about your permissions, contact your site administrator.


> Importing Files


These are instructions for using the Import files tab on the Editor's Tools screen. The CMS can import plain text files into the body of an article on demand. This allows site administrators to utilize 'drop box' folders from which Cofax can import content for output from their publishing systems.

Under Local Files will be a list of files located on the CMS server.

If you've configured your publication to use FTP to import content a list of files will be displayed under the Remote Files. If you haven't, or the FTP server cannot be reached, an appropriate message will be displayed telling you why you cannot use this section.

Choose a file and click Import File.

Clicking the Import File button has brought you to the Articles screen. The file name of the text file has pre-populated the Code field. The text of the file is in the Body field. Make any other changes and save your article.


> Searching for Articles


These are instructions for using the Search tab on the Editor's Tools screen. Choosing the correct search terms should return a list of articles available. A link to the editing screen will appear in each returned article.

The easiest way to conduct a search is to simply select a publication, or publications, and a date range, and click the Search Articles button. Beware, however, as you might get more than you bargained for, as this will return all articles within the selected publications for your dates. A better way to search is to narrow your criteria. By selecting the right combination of search terms and criteria a much smaller set of returned articles will be found, hopefully including the one(s) you're looking for.

As before, begin by selecting the publication(s) that you would like to search through. Select multiple publications by option-clicking on them (If multiple publications are available to you). Also, pick a date range.

Choose a section (Section is:) or mapping code (Mapping is:) to search through if you desire. If you are grouped to multiple publications, your working publication's sections will appear first, followed by a list of other publications's sections that you are grouped to, prefixed with the publication's name. (dailynews:Sports).

In the Options section you can do a text search. The three Make Selection bars enable a user to search through various properties of an article (body, headline, etc.). You are limited to 50 characters in the text fields. Use the Contains bar in the middle to choose what type of search operation you would like to perform. (Note that when you choose the Body parameter from the Make Selection bar you are limited to Contains and Does Not Contain.)

Choose a parameter from the Order By bar and your results will be returned in that order. Search orders are based on the following algorithms for order: spaces, numbers, some special characters, uppercase letters, lowercase letters, other special characters.

The Show drop down determines how many results you would like to see.

Once you've entered all of your desired criteria click the Search Articles button and a list will appear with articles fitting the search parameters (that is, if such articles exist...remember batting just .300 gets you into the Hall of Fame!).

If you like the search you have the option of saving it. Just fill in the Save Search As text box with a memorable name and click the button. This will allow you to conduct future searches with the exact parameters you selected for your present search. (Dates are not saved with saved searches.)

If you want to use a saved search in the future just select one from the Saved Searches drop down and articles fitting your description will be returned (remember the Hall of Fame).


> Ordering a Section


To Start

These are instructions for using the Order Section screen in the Cofax Editor's Tools. By ordering a section you are ordering the rows returned by packageTags that return articles on a particular index.

  • Choose the section you want to order by selecting the desired section from the Order Section drop down menu.

  • Choose the number of stories to show by selecting an option from the Show Stories drop down menu.

  • Choose a date range to order by selecting start date in the From Date menu and an ending date in the To Date menu.

  • Choose how many Pre-Order fields to show by selecting from the Show Pre-Order Fields drop down menu. Pre-Order fields are slots that allow you to create dummy articles that are disabled. When new articles arrive in a feed they replace the articles with the same properties.

  • Click Select Section.

Now What?: Two Options

After clicking the Select Section button, depending on what you've selected in the options above, a number of things can happen. If there are articles that appear with the date range selected, they will be returned within the form and you'll be able to do things to them. What you can do is covered below.

If you've pre-ordered blank articles a section will appear with options for them. Instructions for what to do here also appear below.

Re-ordering Existing Articles

  • From the drop downs on the left choose a new ordering for these articles.

  • The check boxes on the right allow you to delete this mapping for this article, or to disable it altogether or just from the section front page.

  • There is also an Edit link if you feel the need to change anything about the article.

    Pre-Order Non-Existent Articles

    Here you will be presented with as many blank articles as were chosen in the Pre-Order Stories menu above. Just type in the properties of the articles you expect to arrive in the feed here.

    • Slug will be the name of the HTML file your article will become. For more information on this property see the creating articles page.

    • Fill in the Mapping Section if desired.

    • Change the Publication Date if your story will not be published today.


  •  
     

    > Creating or Editing a Section


    These are instructions for using the Sections tab on the Cofax Editor's Tools page. To create a new section just fill in the form as described below. To edit an already existing section, select the desired section from the pull down menu and edit the desired fields. When you are done, simply click on the Save Section icon and all of your changes are now saved in the Cofax system.

    Required Fields

    • Section Code is an identifier you will identify stories sent in via a feed as belonging to this mapping code. If you don't know what it is, make it match Section URL or type in a random string.

    • Section URL is the folder a section will appear in. For example, for either http://web.wichitaeagle.com/content/wichitaeagle/2000/10/10/frontpage/ or http://web.wichitaeagle.com/content/wichitaeagle/frontpage/ the Section Folder should be frontpage. This can be a multifolder path such as sports/eagles for URLs such as http://web.inquirer.com/content/inquirer/2000/10/10/sports/eagles or http://web.inquirer.com/content/inquirer/2000/10/10/sports/eagles.

    • Description is what appears in the tools' pooldown menus. It's a long description of the section for display purposes.

    Optional Fields

    • Select a Parent section to signify what section this category or mapping code belongs to. Leave this at the default for root Sections.

    • Rank (1-999) determines the rank of the section as it will appear in the navigation, if you are using the getNavigation package tag.

    • Section Image URL is the section image that appears on the top of the section pages. When using the template publication tools, images automatically go into http://web.wichitaeagle.com/objects/wichitaeagle/images/eagle.gif (where wichitaeagle.com is the publication name of your site.)

    • View Section Image displays the image when editing an already existing section.

    • Supplementary Images Directory is the path to the folder where you store additional images to be used in this section. For example, http://web.wichitaeagle.com/objects/wichitaeagle/images/

    • Type in a value for URL if you are using the GetNavigation package tag to generate you navigation. This URL will be the URL that the section name links to. You don't need to enter anything here if your section is a regular daily section in cofax. For weekly Cofax content, you can enter a URL such as http://web.philly.com/content/inquirer/Wed/food/, which will take you to the most recent Wednesday food section.

    • Include is one of two fields that can be called onto a section front. When using the proper tags, the include for a section can be included on that section. This helps to reduce custom template usage.

    • Promo is one of two fields that can be called onto a section front. When using the proper tags, the include for a section can be included on that section. This helps to reduce custom template usage.

    Mapping Code Checkboxes

    • If Display on Index is checked, this section will be displayed when you use the getNavigation package tag.

    • Checking Delete Section will do just that. This action is irreversible and should be used with great caution.


    > Creating or editing an article
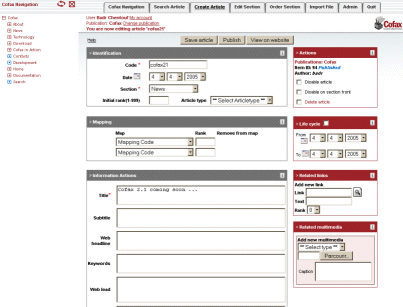

    create article sreenshot

    The Articles screen can be reached in one of three ways:

    • Arriving at it directly from the Editor's Tools log in screen
    • Via the Import File screen
    • Via the Search screen

    However you've reached the Articles tab, there are just a few required fields to fill out before saving the article. Of course, filling in the optional fields will make the article much more interesting to the reader, with links to other stories and the addition of graphics.

    When you're done filling in the required fields and any of the optional you choose to use, simply click the Save Article icon and you'll have added your new article to your site's content.


    Required Fields

    Note: If you arrived at the Articles screen in edit mode (via the Search screen), changing any of the required fields will result in a new article being created based on the old one. You cannot change any of these fields and end up with the same article.

    Code , also called "File Name" or "Slug", will be used in URLs to identify an article along with publication, date, and section. For example, to have a URL equaling /content/inquirer/2002/03/01/myfile.htm you will have typed a "Code" of "myfile" here.

    Publication Date will determine on what date this article will be found. It helps to identify the uniqueness of an article.

    Section will determine the 'main' mapping code of an article. Along with "Code", "Publication", and "Publication Date", it determines the uniqueness of an article.

    Publication is already filled in for you and indicates what publication an article is in. An article's publication designation cannot be changed.

    Item ID is assigned to the story upon story creation. The Item ID remains static throughout the life of the story regardless of version. It can be used to call for a story you are constantly updating, such as weather.


    Optional Fields

    The Disable check boxes allow you to 'disable' an article's display through the CDS on two different layers - the article story page itself by checking "article" and section front digests by checking "section".

    The Delete definitively article check box allows you to permanently delete an article from the database. This box should be used with care.

    Initial rank will determine an article's ranking on a section front, if that section has not been re-ordered using the " Order Section " tab.

    Article Type identifies an article with an "article type"'. These can be particular columnists, or other kinds of article types that have been created in the " Edit Article Type " screen. Article Types stay consistent to an article no matter what section or "Mapping Code" an article has been mapped to.

    Mapping Codes are additional sections/categories you want an article to be related to and to be shown in. You can map an article to an unlimited number of sections. Three more slots at a time will open up on the form if you use all that are available on the form by default. (You'll have to save and re-edit the article for this to happen.) The Rank field will determine where in that section/category an article will appear. Simply check the Remove from map check box to delete an article's relationship to a mapping code.

    Title is the main title that accompanies a story.

    Subtitle is a secondary title to accompany a story.

    Web Headline is an additional field you can use for headlines in your display.

    Lead appears on story digests below headlines. It should consist of the first paragraph of the body or at least the first few sentences. This should be repeated in the body.

    Lead In is the first sentence or teaser from the Lead, if used.

    Byline is the byline you wish to accompany an article.

    Body is the body text of the article itself, which should include the lead if desired.


    Adding Graphics to Your Article (optional)

    First, select what type of image you are trying to add from the Select Type pulldown. Currently, there are two types of graphics: article images and section images. An article image will be displayed (when called by a package tag) in a article template. Similarly, a section image will be displayed (when called by a package tag) in a section template.

    Next, click the Browse button and select a graphic to upload from your hard drive.

    Finally, type a caption in the Caption field. A caption is the text that will be displayed below the graphic (when called by a package tag.)


    Adding Links to Your Article (optional)

    You can add or edit related links assigned to an article in the Related Links section. Clicking the Search Cofax button will take you to the Search Article screen. On that page you can enter search terms to find the article you'd like to link to. If there are results returned there will be a "Link Article" link within that article's field. Merely click the link and you'll be taken back to the Create Article screen with your link filled in for you. The Text box will be the text filled in the "Title" box when that article was created.

    Like Mapping Codes above, if all available slots are taken, simply save and re-edit the article and more will be made available.


    Powered by Cofax - Please see www.cofax.org for more information.

    Valid HTML 4.01!    Valid CSS!